Row Boat Plans: DIY Your Own Traditional Rowing Boat
Hey there, fellow water enthusiasts! Ever dreamt of gliding across a calm lake in a boat you built yourself? The smell of fresh wood, the satisfying creak of the oars… it's a pretty magical experience. And guess what? It's totally achievable! This guide will walk you through building your own traditional rowing boat – a project that's more rewarding than you might imagine. We'll cover everything from choosing the right plans to the final varnish, so grab your tools and let's get started!
Choosing Your Rowboat Design: Finding the Perfect Plans
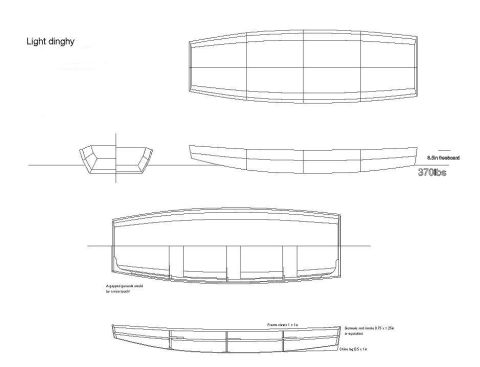
Before you even think about grabbing a saw, you need plans. And there are tons of them out there! You can find pre-made plans online, from simple designs perfect for beginners to more complex, elegant boats that'll challenge even experienced woodworkers. Think about what kind of rowing boat you envision:
Factors to Consider When Choosing Your Plans:
- Boat Size: How many people will you be rowing with? A solo boat is much smaller than a boat for four. Consider how much space you need for storage as well.
- Boat Length: Longer boats generally glide more easily but are harder to maneuver in tight spaces.
- Boat Type: There are several types of traditional rowing boats, each with unique characteristics (e.g., skiffs, dinghies, whalers). Research them to find the best fit for your needs and skill level. A simple, flat-bottomed design is usually best for beginners.
- Your Skill Level: Choose plans that match your woodworking abilities. Don't start with a complex design if you're a beginner. A simpler project will boost your confidence and help you learn the basics before tackling something more ambitious.
- Materials Availability: Check whether the materials specified in the plans are readily available in your area. Some might require special ordering or substitutions.
Once you've considered these factors, you can start searching for plans online or in woodworking books. Many websites offer digital plans for download, and there are also plenty of physical books dedicated to boatbuilding. Take your time choosing, and don't hesitate to compare several options.
Gathering Your Materials and Tools: The Essentials
Now for the fun part – gathering your materials! The specific materials will depend on your chosen plans, but here's a general list of what you'll likely need:
Essential Materials:
- Wood: This is the most important part! Common choices include marine-grade plywood (highly recommended for durability), cedar, oak, or mahogany. The plans will specify the type and quantity needed.
- Epoxy Resin and Hardener: This will seal and strengthen the wood, protecting it from water damage. Choose a high-quality marine-grade epoxy.
- Fiberglass Cloth: Adding fiberglass will add extra strength and water resistance to your boat. Again, marine-grade is crucial.
- Fasteners: Screws, bolts, and rivets will be needed to assemble the boat. Choose stainless steel or bronze fasteners for corrosion resistance.
- Wood Filler: To fill any gaps or imperfections in the wood.
- Paint or Varnish: To protect the finished boat from the elements. Several coats of marine varnish are highly recommended.
- Oars and Oarlocks: Don't forget the essentials for actually rowing!
Essential Tools:
- Measuring Tapes and Squares: Precision is key in boatbuilding!
- Jigsaw or Circular Saw: For cutting the wood to size.
- Drill and Drill Bits: For creating pilot holes before screwing.
- Clamps: Plenty of them! You'll need these to hold the pieces together while the glue dries.
- Sandpaper: Various grits for smoothing the wood.
- Safety Gear: Eye protection, dust mask, and work gloves are essential.
Remember to double-check your plans for a comprehensive list of materials and tools. It's better to have everything you need before you start!
Building Your Rowboat: A Step-by-Step Guide
This is where the real work begins! The exact steps will, of course, vary depending on your chosen plans, but here's a general overview of the process:
Step 1: Preparing the Wood:
Carefully cut the wood pieces according to the plans. Sand all surfaces smooth to ensure a good fit.
Step 2: Assembling the Hull:
This is usually the most challenging part. Follow the plans meticulously, using clamps to hold the pieces together while the epoxy cures. Take your time and ensure everything is aligned correctly.
Step 3: Adding Strength and Water Resistance:
Apply layers of epoxy resin and fiberglass cloth according to the instructions on the plans. This step adds significant strength and waterproofing.
Step 4: Finishing Touches:
Once the epoxy and fiberglass have cured, sand the hull smooth. Apply several coats of marine-grade varnish or paint to protect the wood from the elements.
Step 5: Attaching Oarlocks and other fittings:
Carefully attach the oarlocks and any other necessary fittings.
Testing Your Rowboat: The Grand Finale!
After all that hard work, it's time for the ultimate test! Carefully launch your boat into calm water and give it a test row. Make sure everything is secure and that the boat handles well. Enjoy the fruits of your labor!
Frequently Asked Questions
Q: How long does it take to build a rowboat?
A: This depends greatly on the boat's complexity and your experience. A simple design might take a few weeks, while a more complex project could take several months.
Q: Can I build a rowboat without any prior woodworking experience?
A: It's definitely possible, but it's best to start with a simple design and take your time. Don't be afraid to ask for help from experienced woodworkers.
Q: How much does it cost to build a rowboat?
A: The cost varies greatly depending on the materials and design. You can build a boat relatively cheaply using readily available materials, but higher-end materials will increase the cost.
Q: What kind of wood is best for a rowboat?
A: Marine-grade plywood is a popular choice due to its strength and water resistance. Other options include cedar, oak, and mahogany.
Q: What if I make a mistake during construction?
A: Don't worry, everyone makes mistakes! With careful planning and attention to detail, you can usually correct minor errors. For larger mistakes, you may need to consult the plans and potentially redo sections.
Building your own rowboat is a challenging but deeply rewarding project. With patience, careful planning, and a little bit of elbow grease, you'll soon be enjoying the tranquil waters in a boat you built yourself. Happy rowing!


